Showing posts with label Matchbox. Show all posts

Friday, April 12, 2013

Soviet T.34 with diorama battle display (chapter - 6)

Another busy day - a lot of hard work. After dealing with missing exhaust pipe came time to improve other parts of the model. Let me remind you that the work on the T.34 is restoration of this model and diorama base.

I thought about replacing the Matchbox model to model from another company. The same situation as in the model of Krupp-Protz-diorama. But I do not want another cost. The cost of the new T.34 is about 9 Euro. The work on the model is extended too much...

On photos below You can see new antenna. I don't remember if it was in set from Matchbox. I also installed a missing exhaust pipes.


Wednesday, April 3, 2013

Soviet T.34 with diorama battle display (chapter - 4)


Let's return to the topic of T.34 tank and diorama battle. For a few days I was working on tracks-marks that's left by the tank treads. I think that I spent too much time on these tracks-marks. But the effect is satisfactory for me, and better than the prototype.
YYY


I promised that I will use the photo-comparison, and make it happen. The opinion of what I've done I leave you readers. I care for each evaluation and comments. So write what do you think about my work.
YYY


From now on, I will start work on the tank. The diorama still needs a few details. About those details I wrote in previous posts. So I get back to work. Stay tuned for another post soon.
YYY


Wednesday, March 27, 2013

Soviet T.34 with diorama battle display (chapter - 3)

XXX
Ciąg dalszy zabawy z dioramą T.34.Ślady po gąsienicach czołgu wyglądają jak odciśnięte w błocie. Ponieważ nie mam ochoty robić błyszczącej podstawki zmusiło mnie to do zmiany wyglądu dotychczasowych śladów. W tym celu wypełnię miejsca pokazane na poniższej fotografii masą plastyczną samoutwardzalną.


XXX
Na front poszła Masa modelarska chemoutwardzalna firmy WAMOD. Już nie pierwszy raz korzystam z tego specyfiku. Jego cena waha się w granicach 12 - 17 PLN. Jak widać na fotografii mi udało się kupić masę za 15 PLN.


XXX
Drugi specyfik to POXILINA dwuskładnikowa. Tężeje po około jednej godzinie. W instrukcji producent zapewnia, że materiał ten nadaje się do obróbki mechanicznej nawet drobnymi narzędziami.


XXX
Fotografia poniżej przedstawia porównanie odcisków wykonanych w POXILINIE (po lewej) oraz w masie WAMOD'u (po prawej). Próby przeprowadzałem na pudełku od płyty CD (czarna tylna strona). WAMOD w miarę dobrze trzymał się podłoża, niestety POXILINA odpadła po delikatnym podważeniu. WAMOD nie poddał się tak łatwo.


XXX
Postaram się jak najszybciej wrzucić zdjęcia z nowymi śladami po gąsienicach. Czekam aż WAMOD wyschnie i oszlifuję naddatki materiału, zamontuję płotki i położę podkład.


XXX
Na marginesie: Poniżej próba techniczna zestawienia dwóch zdjęć, ot taka "porównywarka - efektu przed i po". Będę się starał w przyszłości użyć jej od czasu do czasu.


Monday, March 18, 2013

Soviet T.34 with diorama battle display (chapter - 2)

I looked again at the fences on the diorama. After re-estimating size and scale of the fences, I came to the conclusion - those fences looks so grotesque. Vertical planks are too thick. Gaps between those planks are too wide - final effect looked like it was made by a child. Once again, I've made a new fences. This time I've used thinner sheet of plastic. 

The height of the fence:
1200 : 76 ≈ 15,79 mm
1700 : 76 ≈ 22,36 mm

Width of the vertical planks:
150 : 76 ≈ 1,97 mm

Unfortunately, after scaling the fence was that it would look too big compared to the tank. I believe that the correct scale would mean that the end result would look ridiculous.

Once again, I cut a sheet of plastic into small strips, and builded new fences. The gate has been improved by adding a lock. The lock will be stock-still. As shown in the photos below fences look at B- grade, not as at the beginning - at E grade.

On the margin: lines on the cutting mat are 10 x 10 mm.
YYY


Tuesday, February 12, 2013

Soviet T.34 with diorama battle display (chapter - 1)


As I mentioned in a previous blog entries - I have a few started and unfinished models in the workshop. Here I present a new model and thus the next workshop, the "Soviet T.34 with diorama battle display" Matchbox 1:76 scale (Cat. no. 40082).
YYY


Just as the work of "Krupp Protz accident. 69 3-7cm Panzerabwehrkanone" the same company on the same scale - the same model and at the same time I'm going to improve it a bit and add a few new elements.

Below is a photo of the prototype model. Picture from Revell are displayed on the packaging and in online stores as promotional material.
YYY


Model given in the package consists of a tank, stand, and figure. The stand is nothing but a single flat block, which we can provide three pieces of the fence. To my eye the fence does not quite look like a fence.
YYY


I tried to replace the fence. I cut a thin polystyrene plate into thin strips. So I made the boards, which joined the crossbars.
YYY


I tried on the fence to the base, and came to the conclusion that the effect is still poor. So I added a new element in the form of a wooden chalet.
YYY


The photo below shows the whole model. Almost ready.
YYY


Tuesday, January 15, 2013

Krupp Protz Kfz.69 - diorama (chapter - 5)

Before I start making border on new base of diorama, I have to finish all pavement blocks. Each blocks is and will be made separately. I guess it will be about 120 new blocks. Each block has a chamfer. 


Friday, January 11, 2013

Krupp Protz Kfz.69 - diorama (chapter - 4)

Yesterday I compared the model to the diorama. Model of the Dragon it a bit larger than that of Matchbox. Fortunately, this model will fit on the stand. I mounted without glue some parts of the model. Everything fits almost perfectly. I want to buy figures for the diorama. I am looking for the driver and soldiers in sitting position.


Saturday, January 5, 2013

Krupp Protz Kfz.69 - diorama (chapter - 3)

Finally! I found a little time to build models! I feel sad that I was sick all weekend - cold, cough, runny nose. But perhaps due to the fact that I had to sit at home, I was able to build models. When I checked the models that I have to finish it, I noticed that in my T-34 I lost my exhaust pipe. That's why I came back to build a diorama model of Krupp. I worked on the chassis and the vehicle body. I noticed that the part of the driver's seat back has printed shovels. Then I noticed the sketch of moldings found in the manual. It turns out that in the set are two shovels, which should not be used to build the model. Of course ... why not scrape what is on the seat and mount those better shovels?


And so I did. The effect is much better! It is a pity that the manufacturer had not thought about it.

[WORKING IN PROGRESS - TO BE CONTINUED ...]

Thursday, January 3, 2013

Krupp Protz Kfz.69 - diorama (chapter - 2)

Let's return to the topic of the telegraph pole. In the beginning there was another one on the part of the plan - the plan concerned the extension of the entire base and add a second telephone pole and add a hanging wire. One of the telegraph poles had to be slightly tilted. I rejected the idea. Because? Lack of time, and I want to start work on another model.
Sam nie wiem o co mi chodziło w tym wpisie...


[WORKING IN PROGRESS - TO BE CONTINUED ...]

...☺

Wednesday, January 2, 2013

Krupp Protz Kfz.69 - diorama (chapter - 1)

Unfortunately, some time ago I had to close my official website. So I decided to post articles - not only at www.konstruktor.uznam.net.pl, but also at this blog. I hope this will allow me to avoid unpleasant surprises in the future and to keep up the continuity of the posts about my works.

Those who followed my actions on the official website, they know that now I am working on a diorama model MATCHBOX'a named "Krupp Protz Kfz. 69, 3-7cm. Panzerabwehrkanone" - that was the title on the box of the model. Older modelers certainly remember a whole series of such dioramas released to the market by MATCHBOX. Few years ago for a young modeller that was an amazing experience to made the model, which was included parts for diorama.

Now those models are sold by Revell. I saw hat on the sprue logo of MATCHBOX is replaced by REVELL - on some sprues there are only scratches after the logo - but the total implementation of the model is the same as 30 years ago. In the case of the model described above is already 34 years old.
Jakiś czas temu zostały zmuszony do chwilowego zamknięcia strony. Wtedy pomyślałem, że będę zamieszczał informacje w jeszcze innym miejscu. Padło na tego bloga.

Osoby, które śledziły moje poczynania na mojej oficjalnej stronie, wiedzą, że pracuję nad modele MATCHBOX'a, "Krupp Protz Kfz. 69, 3-7cm. Panzerabwerkanone" - tak zostało zatytułowane opakowanie. Starsi modelarze pamiętają całą serię takich dioram produkowanych właśnie przez MATCHBOX'a. Kilkanaście lat temu budowa takiego modelu dla młodeo modelarza było niesamowitym przeżyciem.

Teraz te modele sa produkowane przez firmę REVELL.Ramki posiadają jedynie zatarte logo starego producenta. Ale nadal są to te same modele sprzed 30 lat.


I mentioned on my website that I have a box of models that were damaged during moving to a new apartment. Due to the sentiment of the majority of them, and several unique units, which are now no longer  as hard to find on sale, I decided to restore them.

The first one which went to the workshop was diorama model of the already mentioned "Krupp Protz Kfz. 69, 3-7cm. Panzerabwehrkanone". The model, which lay a few years in a box in the basement was not in good condition. Require cleaning, washing off the old paint, complete missing elements, and adding few better details.

Starting the workshop:

The first thing I did after pulling out the model from the box was washing in the brake fluid DOT-3. After several hours I washed the model with liquid soap - and once dip the model in the fluid. Old paints of  Humbrol not want to give up so easily ...
Wspomniałem też na mojej stronie, ze mam karton starych zniszczonych modeli. Uległy uszkodzeniu podczas przeprowadzki. Wiele pozostawiłem z sentymientu, dlatego, że nie można ich już kupić, z myśla, że je naprawię.

Pierwszy na tapetę trafił właśnie powyższy model. Zmyłem stare farby. W maire możliwości porozklejałem części. Umyłem. uzupełnię brakujące detale. Może dodam coś nowego.

Zaczynamy warsztat

Pierwszą czynnością jaką zrobiłem po wyjęciu modelu z "lamusa" było umycie go w płynie hamulcowym DOT-3. Po kilkunastu godzinach cała farba odpadła, a ja umyłem wszystko mydłem. Przyznam, że farby Humbrol'a nie chciały dać łatwo za wygraną.


On photo above you can see a model that has been broken down into prime factors. Many items fall away because of age or under the influence of the wash in DOT-3. Some parts has been broken during disassembling Some parts started to crack in the a jar with DOT-3!

The view how the enormity of work waiting for me was terrifying. Broken or lost parts - making new details ... that was not on my nerves. To the extent that base was complete, that's as much a vehicle has been in a deplorable state. After a moment's thought, I have decided to replace the model of the vehicle with brand new one. I've searched the internet and found a very well made model from Dragon.
Na zdjęciu powyżej widać, że model został rozłożony na czynniki pierwsze. Wiele części poodpadało podczas zmywania farby. Inne udało się odłupać bez najmniejszego oporu.


Widok ogromu prac jaki mnie czeka, przeraża mnie. Połamane lub brakujące części, dorabianie nowych detali. Ponieważ sama baza, podstawka była kompletna, odpadł mi jeden kłopot. Niestety sam pojazd nie był kompletny. Postanowiłem wymienić go na inny model firmy Dragon.


Unfortunately, the model is made ​​in 1:72 scale, not just as an earlier version of 1:76. After comparing the calculated dimensions it turned out that the scale does not change much with respect to the base. I've accepted fact to reduce the scale of the model. I realized that this is no longer the same model from MATCHBOX.
Niestety model wykonany jest w skali 1:72 a nie jak stary w 1:76. Po porównaniu wymiarów okazało się, że model nie różnią się zbytnio od siebie.


You can find in the internet a photo of  prototype model (photo above). Yes it is look like the original model. My model was not good as this on photo. It was awful.

Back to the workshop...

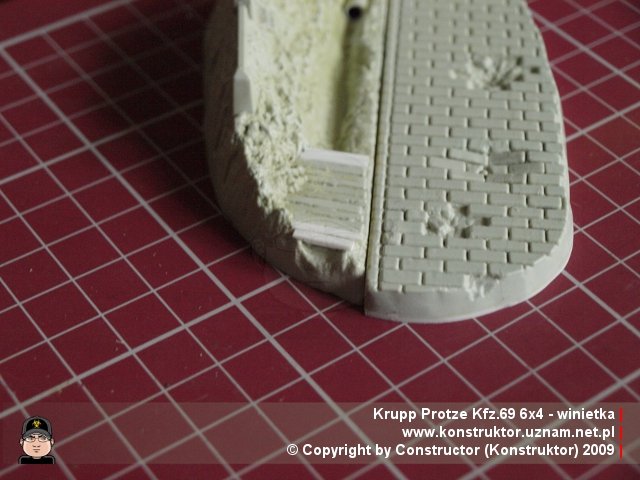
The fact is that the stand (diorama) was, and is produced as one big block consisting of two elements. After gluing those two parts of diorama you can saw a big gap beetween them. One of the halves is less high than the one with slope and fence. I had to give a piece of plate from CD case at the bottom of the part. The crack I filled with the model putty.
W Internecie możecie znaleźć zdjęcie prototypu (zdjęcie powyżej). Mój model nie wyglądał tak dobrze.

Wracamy do warsztatu...

 Faktem jest, że podstawka jest produkowana jako jedna odlana bryła. Zawiera dwa elementy. Po sklejeniu tych dwóch elementów, pomiędzy nimi, powstanie duża szpara. Podłożyłem pod spód kawałek pudełka po CD dla wyrównania podstawy. Szparę wypełniłem szpachlą.


Bridge, drainage pipe in the ditch, fence, telegraph pole (or voltage pole) - all elements were flat or less clear. The first amendment I did was drill a hole in the pipe so that the pipe was no longer an imitation. On the fence I've leave only the vertical bars, which I grind and give correct forms - previously were too rounded. The horizontal bars has been removed completely.
Mostek, rura drenażowa, ogrodzenie, słup telegraficzny - wszystkie te elementy były płaskie, niewyraźnie, bez detali.
Najpierw zająłem się rurą, w której wywierciłem otwór. Przestała ona być imitacją tego czym miała być.
Płot. Zostawiłem tylko pionowe elementy. Dodałem nowe poprzeczki przez co płot stał się bardziej realistyczny.


At the bottom of the stand is a plaquete with the name of the manufacturer and the date of release of the stand (I suppose). Unfortunately, the amount of putty, restorations, etc. meant that I had to cover the base from the bottom. On the new plate on the bottom, I've cut a hole, which was unveiled on a permanent basis that detail.
Na spodzie bazy jest tabliczka ze starym logiem producenta i datą produkcji. Chciałem zostawić ja widoczną. Wyciąłem otwór w dolnej części, zaszpachlowałem ubytki i jakoś to wygląda.


Bridge as well as the pipe was flat shape of the entire stand. There was no space under the plank bridge that would allow the flow of water. Gouging out plastic boards or their complete removal seemed to be too labor intensive. Therefore, on both sides added a few extra boards, which broadened the bridge and hid earlier defect. In addition, given the rail bridge, which further enriched the entire stand. Next to the bridge stuck on a roadside post.
Mostek. Był tak samo słabo wykonany jak płotek i rura. dodałem po bokach kilka deseczek by sprawić wrażenie, że jest pod nim wolna przestrzeń, której wcześniej nie było.
 Dorobiłem poręcz, a obok dodałem mały słupek - taki, na którym oznacza się kilometr drogi.


On the photo below you can see that the base was flooded with water-glue and sprinkled with sand )for chinchillas), which overshadowed all of the slices around the fence posts. The holes in the road also got some sand. On the way I added the stain with sand and "passed" by wheels from the old model.

Na zdjęciu poniżej widać, że część dioramy pokryłem wikolem i posypałem drobnym piaskiem dla szynszyli. Głownie w miejscu gdzie wycinałem stary płot. Niektóre dziury również zostały przysypane piaskiem.
Tą plamę z piasku przejechałem kilka razy kółkami od starego modelu. Dodało to trochę realizmu.


Telegraph pole was converted - I've removed the old insulator and add new one, and I've add new rods.
Słup telegraficzny został przerobiony. Usunąłem stary insulator, dodałem nowy. Dodam tez przewody.

At the moment, that's all. I will continue to work on this model. On a final note, I will try to achieve best result - that's why I ask for your opinions and sugestions.
Na ten moment to wszystko.Będę dalej pracował nad tym modelem. 
Proszę o opinię i komentarze.

[WORK IN PROGRESS - TO BE CONTINUED ...]

...☺